Return to Main Page of Ted’s HTML Tutorial 
Go to Hyperlinks Page in Serbo-Croatian Language 
A “hyperlink” is, most commonly, an underlined word or phrase, or sometimes even a graphic image or icon, which has been tagged with a particular HTML command containing the specific address of another location. Usually, by placing the arrow on the hyperlink and clicking on it, the user will jump quickly or instantly from one location to another location (within the same document, in another document, or somewhere else on the World Wide Web). Occasionally, clicking on a hyperlink will elicit a sound, an image, an animation, or an executable piece of software.
In most internet documents, “unvisited” hyperlinks will be blue in color. After the hyperlink has been activated or “visited,” its color should be changed to purple. On most browsers, these are the two default colors of “unvisited” and “visited” hyperlinks. (On some browsers, the “visited” hyperlink color will be olive.) If you see a hyperlink to a location which your browser previously has visited, its color should be the visited color. (With some web browsers, hyperlinks which make a jump to another location within the same document are always the visited color, whether those hyperlinks have been activated or not.)
The colors of “unvisited” hyperlinks do not have to be blue, and the colors of “visited” hyperlinks do not have to be purple (or olive). If you will recall, the hyperlink you took to get to this page from the “
Ted’s HTML Tutorial” page was sort of a peach color. The next time you see it, its color should have been changed to sort of a dark tan color, because it has been activated to bring you to this page. I chose and implemented those particular colors, thereby overriding the default colors.
All the “unvisited” hyperlinks in a document can be made any color you wish, and all the “visited” hyperlinks can be made any (usually a different) color. The commands to define the color of every unvisited hyperlink and of every visited hyperlink are placed within the <BODY> tag, located near the beginning of the HTML source code document.
Most often, a hyperlink will jump to the beginning of another document. To do this, a pair of “anchor” (A) tags is required:
- <A HREF="URL">text or graphic image</A>: defines an “anchored hypertext reference” (commonly known as a hyperlink), including the unique URL (Uniform Resource Locator or web address) of the target location to which a browser will jump when that link is activated by clicking on it. The file that a hyperlink targets or “calls up” when activated (clicked on) can be an HTML document, a graphic image, a sound, a video, or an executable program.
The <A HREF> tag may contain within it another parameter as part of the command:
TARGET="_blank":
opens up the linked page, specified by the URL, into a new browser window. (Without the TARGET="_blank" parameter, the new page will replace the existing page in the same browser window.)
Sometimes a hyperlink will jump to a certain location within another document, or even within the same document containing the hyperlink. In this case, two pairs of “anchor” (A) tags are required:
- <A HREF="URL#name">text or graphic image</A>: defines an “anchored hypertext reference” (commonly known as a hyperlink), including the unique URL (Uniform Resource Locator or web address) of the target location to which a browser will jump when that link is activated by clicking on it. In addition to the standard URL, a “name” attribute must be included which takes the browser to a specific location within the linked document.
The “name” attribute is used only if the target is located within another document or the same document. (In the specific case that the target of the hyperlink is within the same document as the hyperlink, only the “#name” aspect of the address needs to be listed: <A HREF="#name">. In this case, the initial URL information is unnecessary.)
- <A NAME="name">(optional header, text, or graphic image)</A>: defines an “anchored name” or “called name anchor” (target) to which a browser will jump when a hyperlink (<A HREF="URL#name">) with that target’s address and name is activated. The <A NAME> & </A> tags may be placed next to each other; any text or image between them is optional (although if the tags are located within a list or a table, there should be text between them).
Some browsers will not recognize adjacent pairs of anchored name tags (<A NAME=""> </A> <A NAME=""> </A> <A NAME=""> </A>). Therefore, it is recommended that something (such as a space, letter, word, or graphic) be inserted between one set of <A NAME=""> </A> tags and another set adjacent to it. (Placing the empty, meaningless <!> tag between adjacent sets of anchored name tags will work; the <!> tag is invisible on a browser, and it takes up no space.)
Note: The “name” attribute of both the anchored hypertext reference tag (<A HREF="URL#name">) and the anchored name tag (<A NAME="name">) must match exactly; otherwise, the link will not occur. Moreover, the “name” attribute of the <A HREF="URL#name"> tag must contain the “#” symbol for the link to work properly.
Note: Some browsers will not link to a <A NAME></A> tag which is located inside of a list or a table, although a link is more likely to be successful if text is placed between the <A NAME> and </A> tags.
On rare occasions, one might wish to make a hyperlink on a page a different color than what has been designated in the <BODY> tag. This can be done by placing <FONT COLOR> & </FONT> tags directly around the text within the hyperlink (inside of the <A HREF> & </A> tags). For example, this link to the main page of this tutorial:
<A HREF="index.html"><B><FONT COLOR="#40C0FF">Ted’s HTML Tutorial</FONT></B></A>
appears a different color than any other link on this page:
Ted’s HTML Tutorial
Note: A link created this way can stay only one color; it will remain the same color even after it has been activated.
Often it is desirable not to have hyperlinks to be underlined, which is the default appearance. Furthermore, any hyperlink (underlined or not) can be made to change color when the mouse arrow “hovers” over it. Here is the code that is used to do any or all of these things:
<STYLE>
A:LINK {Text-Decoration: none}
A:VISITED {Text-Decoration: none}
A:HOVER {Color: #XXXXXX}
</STYLE>
where #XXXXXX is any color selected (see Color Coding).
When a hyperlink is in a document which is part of a “frameset,” the <A HREF> tag may contain within it a “target” parameter as part of the command:
- TARGET="frame name": located inside of a frameset, points to a specific frame defined with that “frame name.” A document called up by this hyperlink will appear in the targeted frame when that hyperlink is activated. That is, an activated hyperlink in document #1 (which is located in one frame of a frameset) will call up document #2. Then, document #2 will appear in the frame targeted with the “frame name” from document #1.
This TARGET="frame name" parameter will override any TARGET="frame name" parameter which might appear in a <BASE> tag in the document with the hyperlink. Every frame name must begin with an alphanumeric character (letter or number) except for the “special target names” listed below, each of which begins with the “_” character:
"_BLANK" causes the linked document to load into a whole, newly created browser window which has no name. This new window will appear on top of the previous browser window; if this new browser window is eliminated, the previous browser window will remain.
"_SELF" causes the linked document to load into the same browser window containing the hyperlink. This is the default name for any hyperlink which does not have a TARGET attribute.
"_PARENT" causes the linked document to load into the parent (next higher) frameset in which the document containing the hyperlink is located. If the latter document has no parent frameset, this target name acts like "_SELF", described above.
"_TOP" causes the linked document to load into the entire browser window. It “breaks through” all higher framesets in a nesting and surfaces at the top. If the document containing the hyperlink is part of the first frameset in a nesting of framesets, this target name acts like "_SELF", described above.
Note: A “special target name” is not the actual name of any specific frame. Rather, it targets a specific frame or frameset, relative to the frame where the document is located, in which the new linked document will appear.
All of the links from the “
Ted’s HTML Tutorial” page to locations in this and other documents in this tutorial employ the <A HREF="document#name"> and <A NAME="name"> combination.
An anchored name called “top” has been attached to the heading (“Hyperlinks”) at the top of this page. Furthermore, the heading itself has been converted into a hyperlink, containing “#return” as its targeted address. In the source code, the heading line looks like this:
<A NAME="top"></A><CENTER><H1><A HREF="#return">Hyperlinks</A></H1>
</CENTER>
Next, the following command shows how we can create a hyperlink containing “#top” (that is, the top of this page) as its targeted address, as well as “return” as its anchored name:
<FONT SIZE="4"><A NAME="return"></A><A HREF="#top">Go to the Top of this Page.</A></FONT>
and the hyperlink appears like this:
Go to the Top of this Page.
Note: On some browsers, hyperlinks to locations within the same document are the visited link color, even before they have been activated.
Go ahead and click on the above link to the top of the page. Then click on the title to return.
In most cases, the targeted address of a hyperlink is that of a location external, rather than internal, to the document containing the hyperlink. If the target file is located within the same directory as the file document containing the hyperlink, only the target file name (such as document.html, photo.gif, sports.avi, rock.wav, or typtutor.exe) needs to be listed as the address in the hyperlink code. This address is considered a “partial URL.” (The URL, or Uniform Resource Locator, is the unique address of a file or location within a file.) For instance, the hyperlink at the bottom of this page, returning to the “Hyperlinks” section of the main “
Ted’s HTML Tutorial” page, is written like this in the source code:
<P ALIGN="CENTER"><B><I><FONT COLOR="#C58917">Return to Main Page of </FONT><A HREF="index.html#hyperlinks">Ted#&146;s HTML Tutorial <IMG SRC="graphics/orangeL.gif" ALIGN="BOTTOM" BORDER="0" WIDTH="17" HEIGHT="15"></A></I></B></P>
If, however, the target file is located outside of the same directory (especially, on another web server), the “complete URL” or address of the file (such as
http://www.tedmontgomery.com) must be included in the hyperlink code. (See the following exception, describing the ../ symbol.)
When you want to link from a file in one directory or folder to a file in an adjacent directory or folder, there is an easy way to do this:
- ../: “backs out” of the directory in which the present document is located and “enters” a specified adjacent directory and a file in that new directory. This simple command avoids having to list the complete, lengthy URL of the new directory and file.
For instance, the eye section of my website is located in the “the_eye” directory of my website. If I want to link there, from this page, I can do it one of two ways:
1. <FONT SIZE="4">
<P>Go to <A HREF="../the_eye/index.html">Anatomy, Physiology & Pathology of the Human Eye</A>.</P>
</FONT>
2. <FONT SIZE="4">
<P>Go to <A HREF="http://www.tedmontgomery.com/the_eye/index.html">Anatomy, Physiology & Pathology of the Human Eye</A>.</P>
</FONT>
create hyperlinks which go to the same place:
Go to Anatomy, Physiology & Pathology of the Human Eye.
Go to Anatomy, Physiology & Pathology of the Human Eye.
Note: In the first link, the “../” symbol backs out of the “tutorial” directory, in which this page is located. Then the “the_eye” directory is entered, and the “index.html” file within that directory is opened.
Note: On some browsers, hyperlinks to locations external to that website are the visited link color, even before they have been activated.
A graphic image can be the hyperlink which is activated to get to another location:
- <A HREF="URL"><IMG SRC="graphic.gif or .jpg"></A>: defines an “anchored hypertext reference” (hyperlink), using a graphic image or icon (rather than text) as the “image source” of the visible link. Most commonly, the photograph, icon, or other graphic is a “gif” or a “jpg” image.
If no BORDER parameter is specified within the <IMG SRC> tag, a uniform border around the image is created having a width of 2 pixels. (The unvisited, active, and visited colors of the border will be the same as that of the other text hyperlinks on the page.) BORDER="0" will cause no border to be present around the hyperlink image.
Instead of a document or a location in a document being the target of a hyperlink, it is not uncommon for the target to be another graphic image. In fact, sometimes a small, “thumbnail” version of an image can be used as the hyperlink (e.g., <A HREF="graphic.gif"> <IMG SRC="thumbnail.gif"> </A>) which goes to the larger version of the same image. Both of the following source code commands:
<A HREF="graphics/vivaNM.gif"><IMG SRC="graphics/vivaNM.gif" WIDTH="98" HEIGHT="43" ALT="Viva New Mexico!"></A><BR><BR>
<A HREF="graphics/vivaNM.gif"><IMG SRC="graphics/vivaNM.gif" WIDTH="98" HEIGHT="43" BORDER="0" ALT="Viva New Mexico!"></A>
create these miniature-sized graphic hyperlinks (one with a border, one without a border) which will take you to the full-sized picture if you click on them:

Notice in the source code of each small hyperlink image that the width and height are 98 pixels and 43 pixels, respectively. These measurements are about 25% of the comparable measurements of the larger target image (WIDTH = 390 pixels, HEIGHT = 170 pixels). A “thumbnail” image can be any smaller size and will appear as a miniature replica of the larger image, as long as the measurements of the smaller and larger images are directly proportional. Simply multiply the WIDTH and HEIGHT measurements of the larger image by the same number to obtain the WIDTH and HEIGHT measurements of the smaller, “thumbnail” image. Here is the math for the above measurements:
- WIDTH conversion: 390 × .25 = 97.5
 98
98
- HEIGHT conversion: 170 × .25 = 42.5 43
Note: The WIDTH and HEIGHT dimensions of any graphic image must be in whole numbers. Browsers do not recognize decimal fractions of pixels.
Sometimes, the target of a hyperlink is a sound file. Below is a small picture of me. When you click on it, you should be able to hear a very brief recording of my saying, “Hi, I’m Ted.” (Depending on what browser you are using, a window may pop up asking what you would like to do with the “TedHi.wav” file. If so, select, “Open this file from its current location.”)
 The source code for the above hyperlink looks like this:
<A HREF="sounds/TedHi.wav"><IMG SRC="graphics/Ted.jpg" BORDER="5" WIDTH="91" HEIGHT="116" ALT="Hi, I'm Ted."></A>
If you want the audio file to open in a separate browser window, add TARGET="_blank" to the link code:
<A HREF="sounds/TedHi.wav" TARGET="_blank"><IMG SRC="graphics/Ted.jpg" BORDER="5" WIDTH="91" HEIGHT="116" ALT="Hi, I'm Ted."></A>
The source code for the above hyperlink looks like this:
<A HREF="sounds/TedHi.wav"><IMG SRC="graphics/Ted.jpg" BORDER="5" WIDTH="91" HEIGHT="116" ALT="Hi, I'm Ted."></A>
If you want the audio file to open in a separate browser window, add TARGET="_blank" to the link code:
<A HREF="sounds/TedHi.wav" TARGET="_blank"><IMG SRC="graphics/Ted.jpg" BORDER="5" WIDTH="91" HEIGHT="116" ALT="Hi, I'm Ted."></A>
Often, it is useful to provide a link on a web page which generates an email form by which a visitor can communicate with the manager of the web site. The email link can be either text or a graphic image. A “mailto” command is necessary to designate the appropriate email address, and an optional “subject” command may be added to specify what will be included in the subject field of the email:
- <A HREF="mailto:address?subject=information">text or graphic image</A>: creates a hyperlink which will generate an email form by which a visitor to the web page can email the manager of the web site. There can be no spaces in this command. The “subject” information is optional and, if included, will be inserted automatically into the subject field of the email.
Note: It is a good idea to insert “ ” or “ ” symbols between words in the text of the subject. If ordinary spaces are used, they will be filled in with nonsensical symbols when an email is sent to you. Also, double quotation marks (") cannot be included anywhere in the subject information.
Both of the following source codes:
<A HREF="mailto:tmont714@aol.com?subject=HTML Mailto Commands">Email Me!</A>
<A HREF="mailto:tmont714@aol.com?subject=HTML Mailto Commands"><IMG SRC="graphics/emailme.gif" BORDER="0" WIDTH="85" HEIGHT="32" ALT="Email Me!"></A>
will create hyperlinks which will generate emails to me (click on them to see the email forms):
Email Me!

With HTML, it is possible to embed many different graphic hyperlinks within a larger graphic image. This is called “image mapping.” Clicking these active areas or regions enables the browser to link to different documents or locations. Either an “ISMAP” or a “USEMAP” parameter is placed inside of an <IMG SRC> tag to indicate which style of map will be used.
The ISMAP style of image mapping is supported by all graphical browsers. However, there are certain drawbacks to using it. The entire <IMG SRC> image used must be a hyperlink (that is, placed between <A HREF> & </A> tags). Also, ISMAP references a “server-side” image map, because special server software (usually in a cgi-bin location at the server’s site) must be present to translate the coordinates clicked upon and to determine a response. Furthermore, time-consuming server-side processing of the coordinates, network delays, and other problems all can make this type of image mapping undesirable. For this reason, it will not be discussed further here.
The USEMAP style of image mapping now is supported by an increasing number of browsers. The entire <IMG SRC> image used is not a hyperlink; rather, regions of the image are converted into hyperlinks, each with its own specific URL (address). USEMAP references a “client-side” image map, because the HTML author (client) provides the map of coordinates for the image.
- USEMAP="URL#name": indicates that a client-side map is to be used. The value of the USEMAP parameter is the URL (address) of the document containing the map (which is embodied within <MAP> & </MAP> tags). The “name” aspect of the URL matches the name of the map to be used (which is located inside the <MAP> tag). Usually, the map is in the same document as the <IMG SRC> tag with the USEMAP parameter, in which case only the “#name” value is required for USEMAP.
For a client-side map to work, a set of coordinates and URLs must be included somewhere (typically, in the same document as the <IMG SRC> tag with the USEMAP parameter). This information defines the cursor-sensitive regions of the graphic image and the links taken when these regions are clicked on. Such data is contained between “map” tags labeled with a specific “name”:
- <MAP>map information</MAP>: embodies “<AREA>” tags which contain all the information for a client-side map. The map specifications themselves are not displayed on a browser.
A <MAP> tag must contain within it a “name” parameter as part of the command:
- NAME="name": specifies the name of a map. The NAME parameter is unique for any given map and cannot be used by any other map in the document. The “name” value of the NAME parameter must match the “#name” value of the USEMAP parameter in a <IMG SRC> tag for the map instructions to apply to the latter graphic image. The USEMAP parameters for more than one graphic image may reference the same map.
Between the <MAP> & </MAP> tags are empty “area” tags:
- <AREA>: defines the shape and coordinates of a region in a <IMG SRC> graphic image and the action the browser should take if that region is selected by the user. When the user’s arrow moves over any region (defined by an <AREA> tag) within the graphic image, the arrow will change into a “hand” shape (as it does when encountering any hyperlink), and the URL of the link will be displayed at the bottom of the browser window.
Note: If a certain region of a graphic image is defined by two or more <AREA> tags, the <AREA> tag for that region which is listed first will take precedence.
An <AREA> tag must contain within it other parameters as part of the command:
- SHAPE="RECT|CIRC|POLY": defines the shape of a region in a graphic image which will become a hyperlink and will be sensitive to a user’s arrow. The SHAPE value determines how the values of the COORDS parameter (described next) will be interpreted by a browser.
"RECT" (or "RECTANGLE") (the default) defines a region with four sides and angles.
"CIRC" (or "CIRCLE") defines a circular region.
"POLY" (or "POLYGON") defines a region with multiple sides and angles.
Note: Not all browsers which support client-side mapping will recognize the "CIRC" and "POLY" values.
COORDS="coordinates": defines the pixel coordinates of the SHAPE parameter of a region which will become a hyperlink. (The coordinates of the upper-left corner of a graphic image are 0,0.) The coordinates of points in a graphic image can be determined by using graphic software, such as Paint Shop Pro or Adobe Photoshop.
For a rectangle ("SHAPE=RECT"), the coordinates are "X1,Y1,X2,Y2", where the X1,Y1 coordinates designate the upper-left corner of the rectangular region, and the X2,Y2 coordinates designate the lower-right corner of the region.
For a circle ("SHAPE=CIRC"), the coordinates are "X,Y,R", where the X,Y coordinates designate the center of the circular region and R is the radius of the region in pixels.
For a polygon ("SHAPE=POLY"), the coordinates are "X1,Y1,X2,Y2,...Xn,Yn", where each Xn,Yn set of coordinates designates a vertex of the polygonal region and "n" is the number of vertices. (Since the polygon is closed automatically, it is not necessary to include the first pair of coordinates again at the end of the list.)
HREF="URL#name": defines the URL of the hypertext reference (hyperlink) to which a browser will jump when that region is activated by clicking on it. The “name” attribute is used only if the target is a specific location within the same document or within another document. (In the specific case that the target of the hyperlink is within the same document as the hyperlink, only the “#name” aspect of the address needs to be listed: <HREF="#name">.) The file that a hyperlink targets or “calls up” when activated can be an HTML document, a graphic image, a sound, a video, or an executable piece of software.
NOHREF: optional; indicates that the region defined by the SHAPE and COORDS parameters in the <AREA> tag will not become a hyperlink and, therefore, will not link to another document if selected by a user.
Note: Either an HREF or a NOHREF parameter must be included within each <AREA> tag.
The following 300-pixel × 200-pixel graphic image (containing rectangular and circular regions) and client-side image map information:
<CENTER>
<TABLE>
<CAPTION><B><FONT FACE="LUCIDA HANDWRITING,COMIC SANS MS,ARIAL" COLOR="#00C0C0" SIZE="4">Geometrical Formulas</FONT></B></CAPTION>
<TR>
<TD><IMG SRC="graphics/geoimag1.jpg" USEMAP="#geoshapes1"></TD>
</TR>
</TABLE> (See Tables.)
</CENTER>
<MAP NAME="geoshapes1">
<AREA SHAPE="CIRC" COORDS="150,100,29" HREF="circle.html">
<AREA SHAPE="RECT" COORDS="0,0,149,99" HREF="prllgram.html">
<AREA SHAPE="RECT" COORDS="149,0,299,99" HREF="rctangle.html">
<AREA SHAPE="RECT" COORDS="0,99,149,199" HREF="square.html">
<AREA SHAPE="RECT" COORDS="149,99,299,199" HREF="triangle.html">
</MAP>
would mark up this way on a browser:
Geometrical Formulas
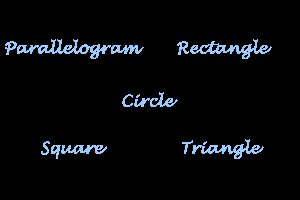 |
Note: The coordinates of the circular region in the center supercede the coordinates of the other other regions, since the <AREA> tag for the circular region is listed first in the map section of the source code. Remember, however, that some browsers do not recognize circular regions (mapped with AREA SHAPE="CIRC").
Similarly, this 300-pixel × 200-pixel graphic image (containing polygonal, rectangular, and circular regions) and client-side map information:
<CENTER>
<TABLE>
<CAPTION><B><FONT FACE="LUCIDA HANDWRITING,COMIC SANS MS,ARIAL" COLOR="#00C0C0" SIZE="4">Geometrical Formulas</FONT></B></CAPTION>
<TR>
<TD><IMG SRC="graphics/geoimag2.jpg" USEMAP="#geoshapes2"></TD>
</TR>
</TABLE> (See Tables.)
</CENTER>
<MAP NAME="geoshapes2">
<AREA SHAPE="CIRC" COORDS="150,100,28" HREF="circle.html">
<AREA SHAPE="POLY" COORDS="35,9,121,9,95,60,9,60" HREF="prllgram.html">
<AREA SHAPE="RECT" COORDS="182,10,293,61" HREF="rctangle.html">
<AREA SHAPE="RECT" COORDS="34,141,85,192" HREF="square.html">
<AREA SHAPE="POLY" COORDS="263,142,293,193,182,193" HREF="triangle.html">
</MAP>
would look this way on a browser:
Geometrical Formulas
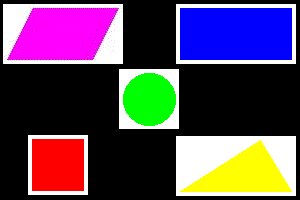 |
Note: The coordinates for each shape have been specified such that a user’s arrow will be changed into a “hand” shape inside any of the geometric shapes and will link to information about that shape when clicked. Remember, however, that some browsers do not recognize circular and/or polygonal regions (mapped with AREA SHAPE="CIRC" and/or AREA SHAPE="POLY").
Proceed to Tables
Return to Main Page of Ted’s HTML Tutorial
Go to Hyperlinks Page in Serbo-Croatian Language
Copyright © 1998– by Ted M. Montgomery. All rights reserved.