convergence insufficiency
Convergence insufficiency is a difficulty or inability of the eyes to converge and work together at a near distance for extended periods of time, such as when reading, writing, drawing, or viewing a computer screen. Sometimes, there is an inability to converge the eyes at all, which can result in diplopia (double vision).
With convergence insufficiency, headaches, dizziness, and/or nausea can result when doing near work for awhile. This can lead to an inability to concentrate and even irritability.
This condition is caused by a muscle imbalance, where the lateral rectus muscles exert more tension on the eyes than the medial rectus muscles do. Often, this can be treated with visual therapy and/or base-in prismatic power in lenses.
pencil pushups
Convergence insufficiency may be diagnosed after a comprehensive eye examination by a qualified eye doctor. Once a diagnosis of convergence insufficiency has been made, a simple visual therapy technique that may be helpful is “pencil pushups.”
It is not critical to keep the pencil and eraser clear as you bring it closer to you. What is important is to keep it single.
Do this exercise 3 to 5 times a day or whenever eyestrain or a work-related headache develops. Over time, try to get the pencil eraser as close to your nose as possible, still keeping it single. Some people can keep the pencil single all the way up to their noses, but bringing it that close is not necessary. If you can bring it to within 3 to 5 inches away, that is doing well.
This exercise strengthens your medial rectus muscles, which pull your eyes inward. Eventually, it should become easy to look from far to near, back and forth, without feeling any strain on the eyes. Also, there also should be less eyestrain when doing extended periods of near work, such as reading, writing, drawing, or viewing a computer screen.
convergence excess
Convergence excess is an over-convergence of the eyes at a near distance for extended periods of time, such as when reading, writing, drawing, or viewing a computer screen. Sometimes, the over-convergence can result in diplopia (double vision).
With convergence excess, headaches, dizziness, and/or nausea can result when doing near work for awhile. This can lead to an inability to concentrate and even irritability. Convergence excess also can be associated with uncorrected hyperopia or with nearpoint stress.
This condition is caused by a muscle imbalance, where the medial rectus muscles exert more tension on the eyes than the lateral rectus muscles do. Often, this can be treated with plus-powered lenses, base-out prismatic power, and/or visual therapy.
pencil spreading
Convergence excess may be diagnosed after a comprehensive eye examination by a qualified eye doctor. Once a diagnosis of convergence excess has been made, and plus lenses have bave been prescribed, a simple visual therapy technique that may be of further help is “pencil spreading.”
1. Hold two pencils at arm’s length, with the erasers at eye level. Looking at the erasers, find an object across the room, such as a clock on the wall (at least 20 feet away). While looking at the pencils at near, you actually should see two clocks far away. Place the pencils such that one clock appears to be behind each pencil eraser.
 |
2. Keeping the pencils where they are, look up at the clock across the room. If you do it right, you will see one clock and three pencils. Superimpose the middle pencil (which is an image of the two pencils fused together) upon the clock. Now, keeping your eyes relaxed, slowly move your fixation from the clock to the middle pencil eraser.
 |
3. Initially, when you do this, you may see two pencils in the middle. If so, you may need to look back at the clock to make there be only one pencil in the middle.
 |
4. Again, slowly move your fixation to the middle pencil eraser. You need to be able to keep the middle pencil single for a few seconds before going further.
|
5. To keep the middle pencil single, you will be using your lateral rectus muscles to exert a little tension on your eyes. (Over-convergence will cause you to see two middle pencils.) Very gradually, about 1 to 2 millimeters at a time, spread the pencils further apart. When the middle pencil doubles, stop and try to pull your eyes outward to make it single. A mild “pulling” sensation in your eyes while doing this is normal. If the middle pencil doubles even more, you are using the wrong muscles.
You might not be able to keep the middle pencil thin; it may look like a single, “wide” pencil, which is fine. Keep gradually pulling the pencils apart until you no longer can keep a single pencil in the middle. Bring the pencils a tiny bit closer together, until a single image can be obtained, and hold your fixation there for 10 to 15 seconds. Keeping the middle pencil single like this strengthens your external rectus muscles.
 |
It is not critical to keep the middle pencil and eraser clear as you spread apart the two pencils you are holding. What is important is to keep it single, even if it looks like a “wide” pencil.
Do this exercise 3 to 5 times a day or whenever eyestrain or a work-related headache develops. You will reach a limit beyond which you will not be able to spread the pencils any further apart. For most people, this is about 7 centimeters or about 2ľ inches. Probably the maximum possible spread for anyone is about 9 centimeters or about 3˝ inches.
This exercise strengthens your lateral rectus muscles, which pull your eyes outward. Eventually, it should become easy to fuse the two pencil erasers into one at a preset distance between them without having to spread them apart. Also, there also should be less eyestrain when doing extended periods of near work, such as reading, writing, drawing, or viewing a computer screen.
thumb spreading
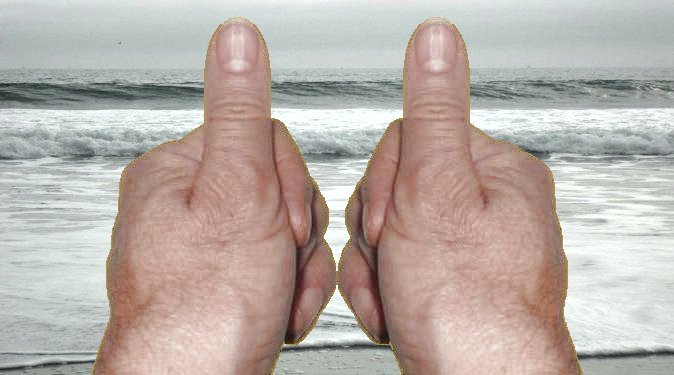
Incidentally, you do not have to use two pencils; your two thumbs may be more convenient, since they’re always with you. At times, I can elminate an eye-related headache or eye strain in about a minute by doing the “thumb spreading” technique. To use the thumbs below, do the following (but read all the instructions first before continuing), and remember that you may feel a normal “pulling” sensation in your eyes while doing this exercise:
- Click here or on the thumbs below, and they will appear in a separate window. Click here to see an orange background behind the thumbs.
- Look between the thumbs, relax your eyes, and stare “through” your screen, imagining that you are viewing an object off in the distance. The two thumbs should become four thumbs. The more you are able to relax your eyes, the more the two middle thumbs will move toward each other.
- Once you are able to fuse or superimpose the two thumbs middle thumbs and see the single thumb in the middle (with a thumb on each side), look at the middle thumb (mainly the thumbnail) for a few seconds. You will be using your lateral rectus muscles to diverge your eyes and to fuse the thumbs into one.
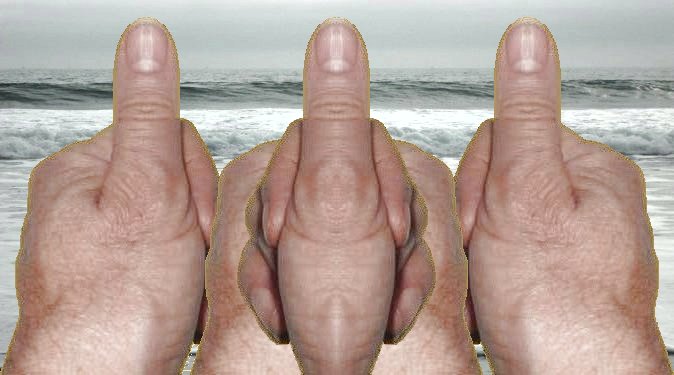
- Click on the thumbs; they will spread a little further apart, and the thumb in the middle will be slightly double.
- Fuse the thumbs so that there is one single thumb in the middle again. Stare at it for a few seconds, and then click on the thumbs again to spread them a little further apart.
- There are a total of 14 frames of progressively spreading thumbs. You may not be able to go all the way to the end and still keep a single thumb in the middle. Just go as far as you can.
This was made, ideally, for a screen with a 1280 pixel × 800 pixel resolution. A lower resolution screen will cause the thumbs to start out wider, so you probably will not be able to progress as far. A higher resolution screen will cause the thumbs to start out closer together, so you may be able to go through all 14 frames more easily.
Click here or on the thumbs below to bring up a window where you can click on the thumbs each time you want to spread them a little further apart. Click here to see an orange background behind the thumbs. There are a total of 14 frames, including the first frame. In case you should feel dizzy while fusing the images together into one, discontinue the exercise.
Click here to let the thumbs spread apart automatically, a little further every 3 seconds. Click here to see an orange background behind the thumbs. If you want them to spread apart more quickly, you can click on them before the 3 seconds have passed.
Below is what the left and right thumbs will look like when they are superimposed upon each other as they are being spread apart, with your left eye looking at the left thumb and your right eye looking at the right thumb. Click here to see an orange background behind the thumbs.
Return to the Main Page 
of Anatomy, Physiology & Pathology of the Human Eye

Copyright © 1998– by Ted M. Montgomery, O.D. Most rights reserved.
.jpg)